An introduction to MLOps with MLflow
Romain Avouac (Insee), Thomas Faria (Insee), Tom Seimandi (Insee)
Introduction
Who are we ?
- Data scientists at Insee
- methodological and IT innovation teams
- support data science projects
- Contact us
Context
Difficulty of transitioning from experiments to production-grade machine learning systems
Leverage best practices from software engineering
- Improve reproducibility of analysis
- Deploy applications in a scalable way
- Monitor running applications
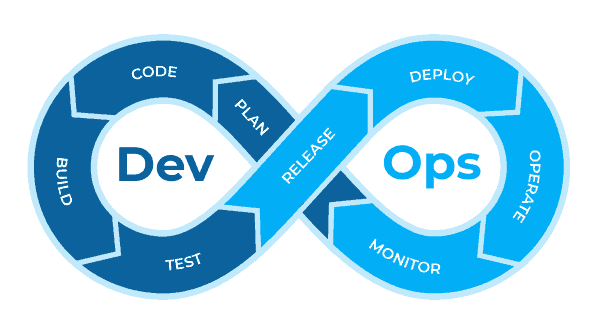
The DevOps approach
- Unify development (dev) and system administration (ops)
- shorten development time
- maintain software quality
The MLOps approach
- Integrate the specificities of machine learning projects
- Experimentation
- Continuous improvement
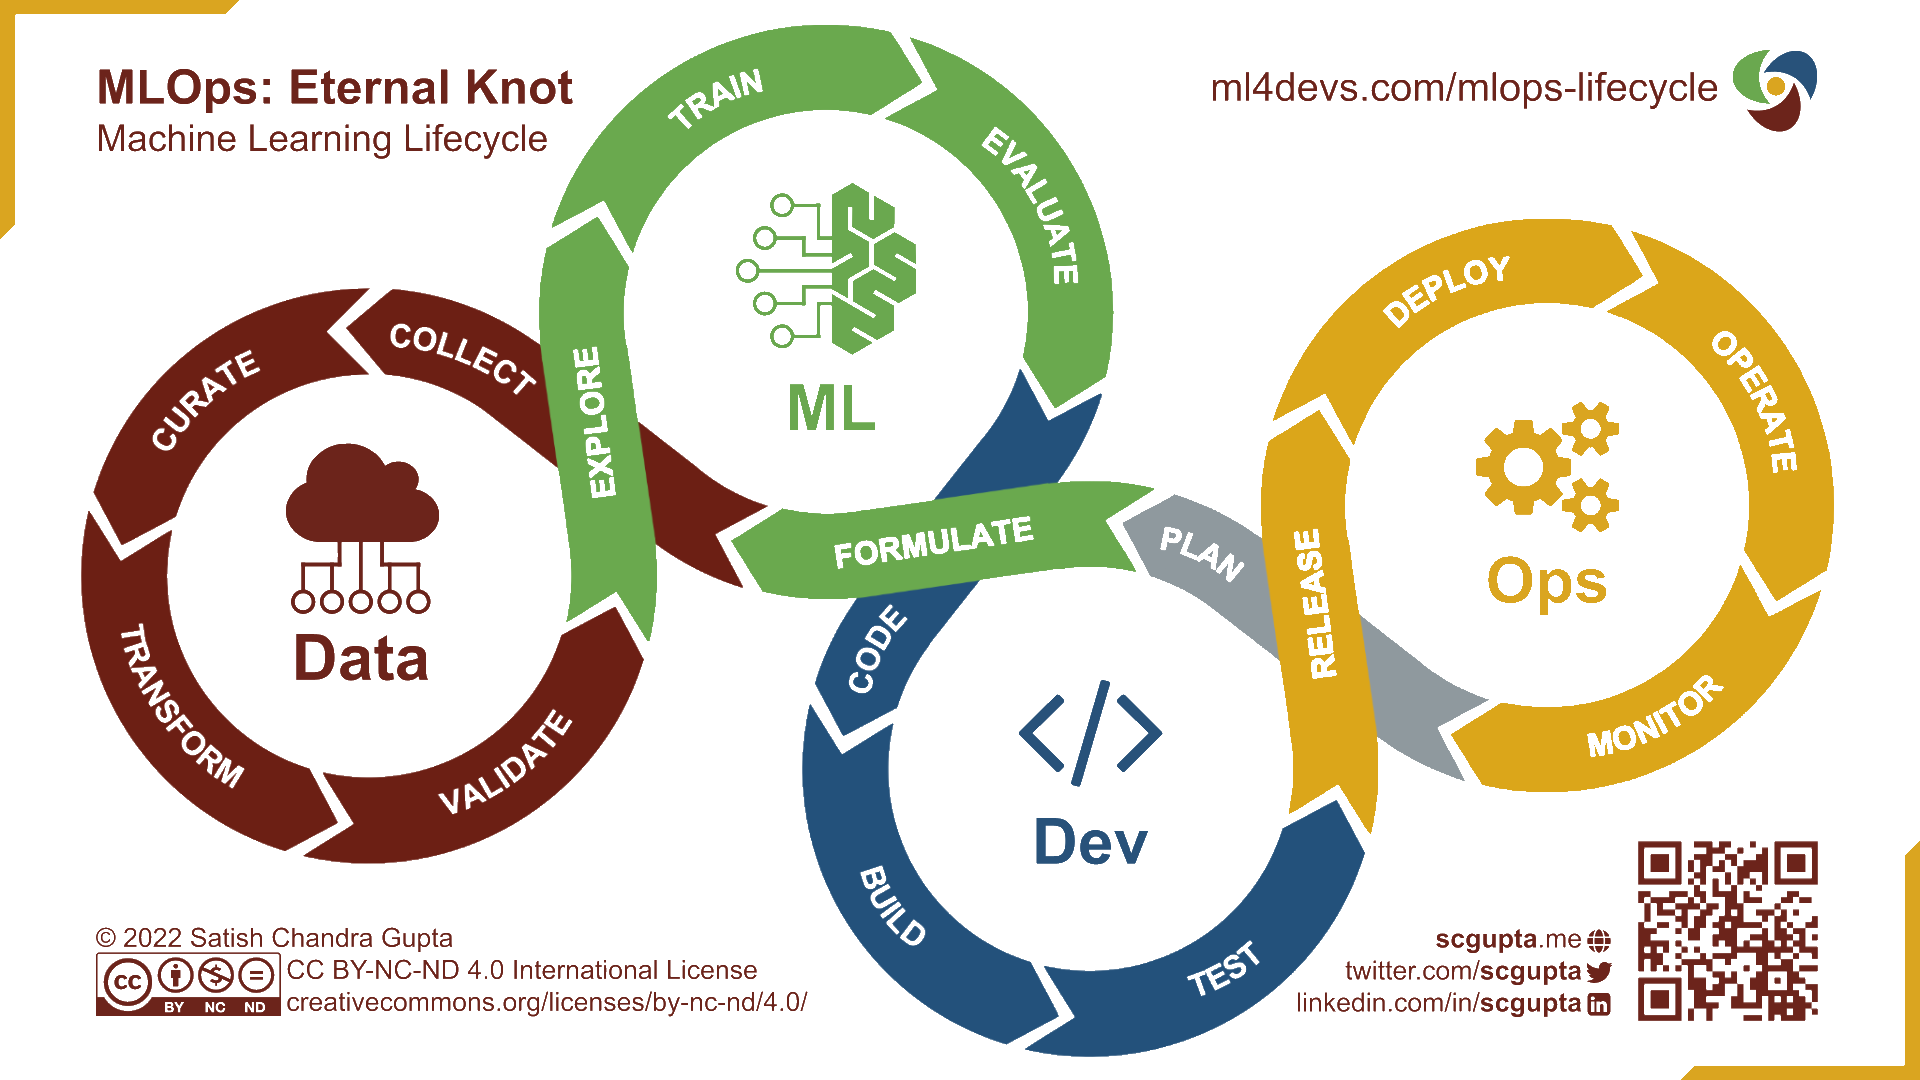
MLOps : principles
Reproducibility
Versioning
Automation
Monitoring
Collaboration
Why MLflow ?
Multiple frameworks implement the MLOps principles
Pros of
MLflow- Open-source
- Covers the whole ML lifecycle
- Agnostic to the ML library used
- We have experience with it
Training platform : the SSP Cloud
- An open innovation production-like environment
- Kubernetes cluster
- S3-compatible object storage
- Large computational resources (including GPUs)
- Based on the Onyxia project
- User-friendly interface to launch data science services
- A catalog of services which covers the full lifecycle of data science projects
Outline
1️⃣ Introduction to MLFlow
2️⃣ A Practical Example: NACE Code Prediction for French companies
3️⃣ Deploying a ML model as an API
4️⃣ Distributing the hyperparameter optimization
5️⃣ Maintenance of a model in production
Application 0
Preparation of the working environment
It is assumed that you have a
Githubaccount and have already created a token. Fork the training repository by clicking here.Create an account on the SSP Cloud using your professional mail address
Launch a
MLflowservice by clicking this URLLaunch a
VSCode-pythonservice by clicking this URLOpen the
VSCode-pythonservice and input the service passwordIn
VSCode, open a terminal and clone your forked repository (modify the first two lines):Install the necessary packages for the training (with
uv):```
You’re all set !
1️⃣ Introduction to MLFlow
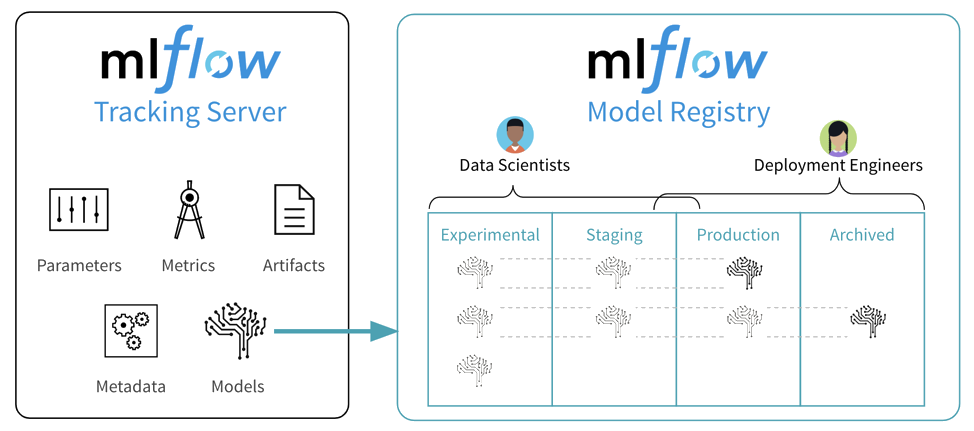
Tracking server
- “An API and UI for logging parameters, code versions, metrics, and artifacts”
![]()
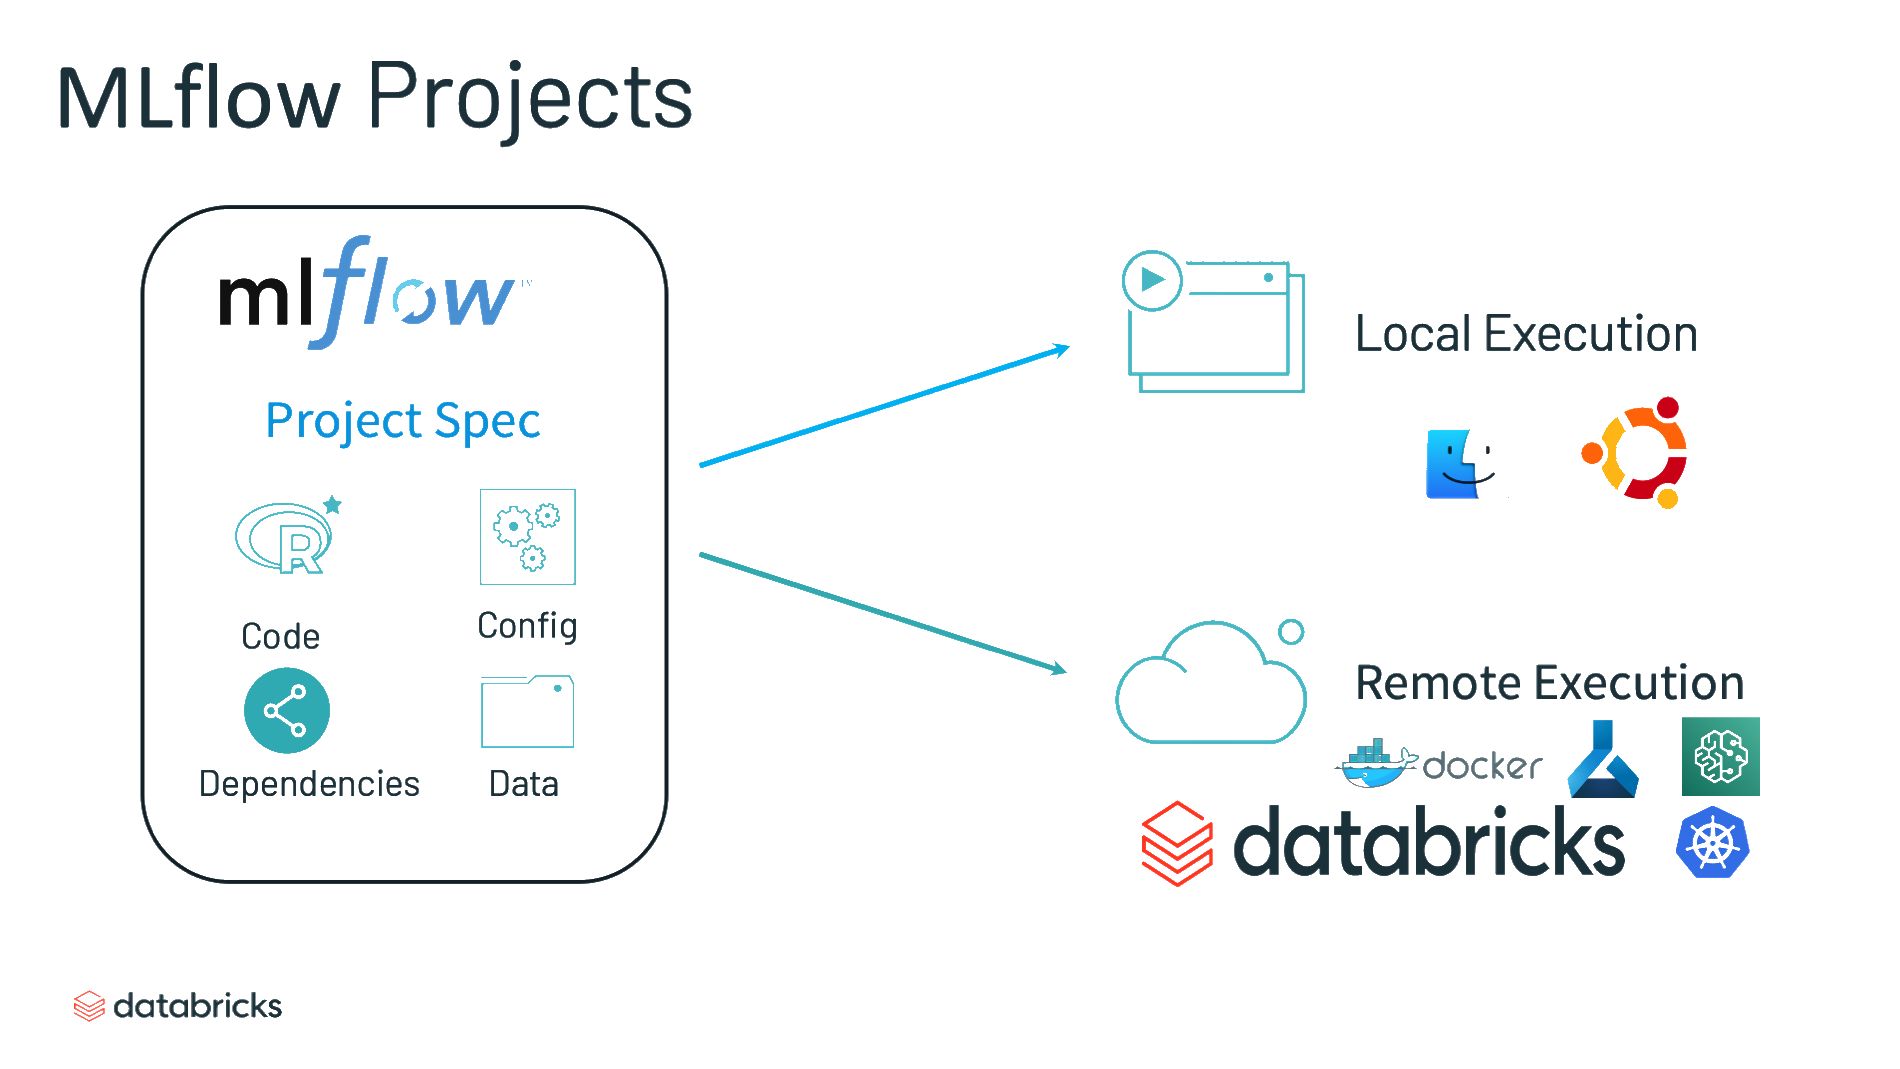
Projects
- “A standard format for packaging reusable data science code”
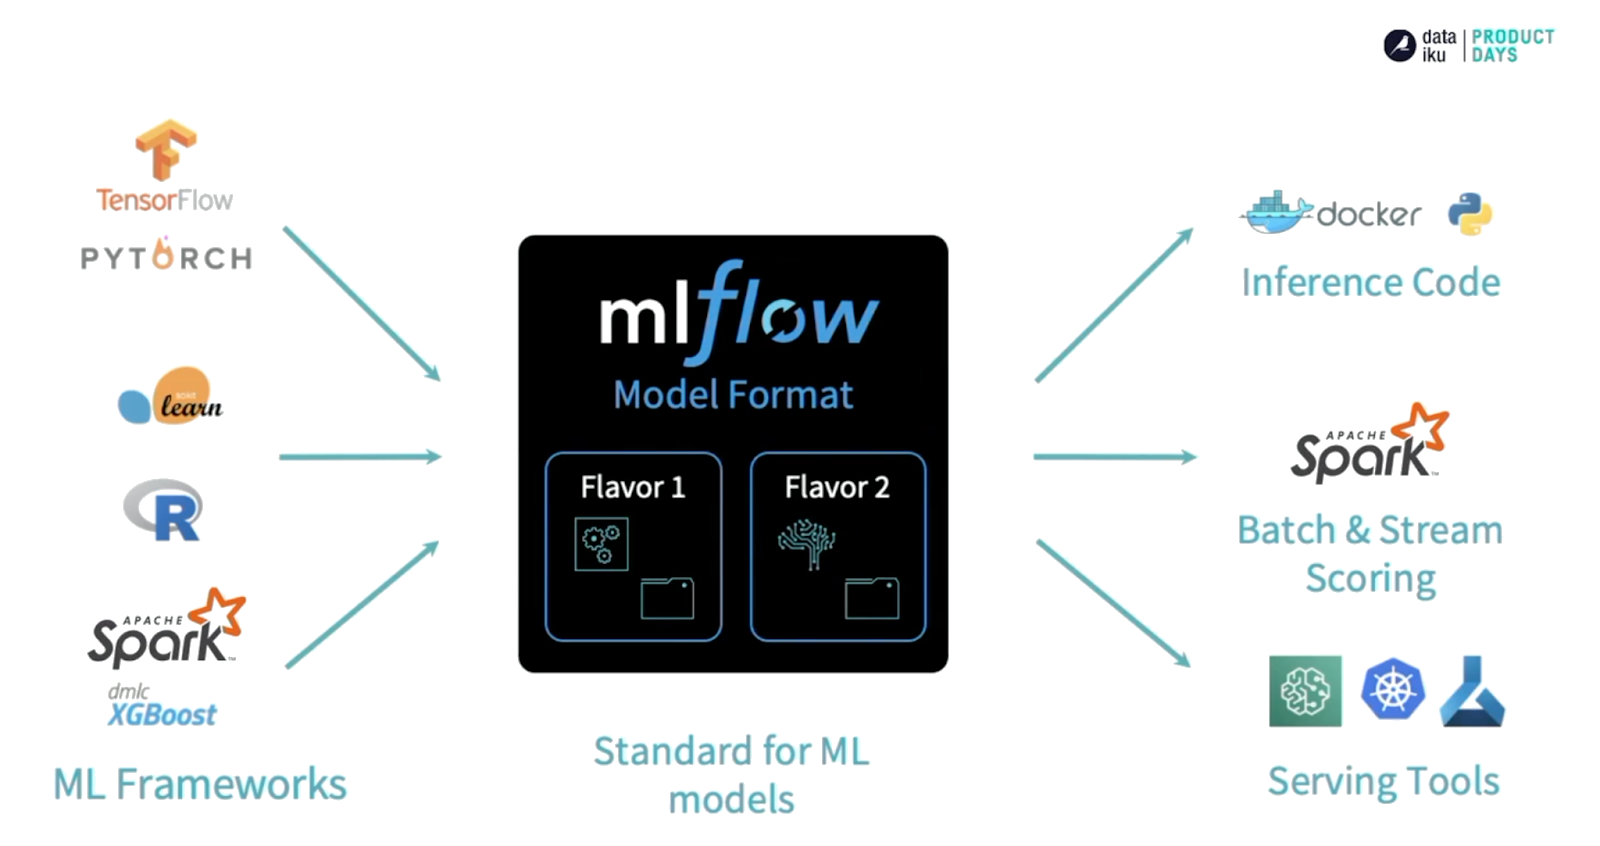
Models
- “A convention for packaging machine learning models in multiple flavors”
Model registry
- “A centralized model store, set of APIs, and UI, to collaboratively manage the full lifecycle of an MLflow Model”
Application 1
Introduction to MLflow concepts
- In
VSCode, open the notebook located atformation-mlops/notebooks/mlflow-introduction.ipynb - Execute the notebook cell by cell.
- If you are finished early, explore the
MLflowUI and try to build your own experiments from the example code provided in the notebook. For example, try to add other hyperparameters in the grid search process.
Summary
MLflowsimplifies the tracking of model training- Keeps record of experiments and their outputs
- Simple integration with main ML frameworks
- Limitations
- How to use custom frameworks (non-natively integrated)?
- How to move from experimentation to production?
2️⃣ A Practical Example
Context
NACE
- European standard classification of productive economic activities
- Hierarchical structure with 4 levels and 615 codes
At Insee, previously handled by an outdated rule-based algorithm
Common problematic to many National Statistical Institutes
FastText model
“Bag of n-gram model” : embeddings for words but also n-gram of words and characters
Very simple and fast model
OVA: One vs. All
Data used
- A simple use-case with only 2 variables:
- Textual description of the activity – text
- True NACE code labelised by the rule-based engine – nace (732 modalities)
- Standard preprocessing:
- lowercasing
- punctuation removal
- number removal
- stopwords removal
- stemming
- …
MLflow with a non standard framework
- Easy to use with a variety of machine learning frameworks (scikit-learn, Keras, Pytorch…)
- What if we require greater flexibility, e.g. to use a custom framework?
- Possibility to track , register and deliver your own model
MLflow with a non standard framework
- There are 2 main differences when using your own framework:
- logging of parameters, metrics and artifacts
- wrapping of your custom model so that MLflow can serve it
From experiment towards production
- Notebooks are not suitable to build production-grade ML systems:
- Limited potential for automation of ML pipelines.
- Lack of clear and reproducible workflows.
- Hinders collaboration and versioning among team members.
- Insufficient modularity for managing complex ML components.
Application 2
Part 1: Using a custom model
- All scripts related to our custom model are stored in the
srcfolder. Check them out. In particular, thetrain.pyscript is responsible for training the model. What are the main differences compared to application 1? - Why can we say that the
MLflowmodel integrates preprocessing?
Application 2
Part 2 : From notebooks to a package-like project
The
train.pyscript is also responsible for logging experiments inMLFlow. Note how the parameters of each experiment are passed to the training function when the script is called.To make the model training procedure more reproducible,
MLFlowprovides themlflow runcommand. TheMLprojectfile specifies the command and parameters that will be passed to it. Inspect this file.Run a model training using
MLFlow. To do this, open a terminal (-> Terminal -> New Terminal) and execute the following command:In the MLflow interface, examine the results of your previous run:
Experiments -> nace-prediction -> <run_name>
You trained the model with certain default parameters. In the
MLprojectfile, check the available parameters. Retrain a model with different parameters (e.g.,dim = 25).
Click to see the command
- In
MLflow, compare the 2 models by plotting the accuracy against one parameter you have changed (i.e.dim)Select the 2 runs -> Compare -> Scatter Plot -> Select your X and Y axis
- Save the model with the best accuracy as
fasttextto make it easily queryable fromPython.
Application 2
Part 3: Querying the locally trained model
- Create a script
predict_mlflow.pyin thesrcfolder of the project. This script should:- Load version 1 of the
fasttextmodel - Use the model to predict NACE codes for a given list of activity descriptions (e.g.,
["vendeur d'huitres", "boulanger"]).
- Load version 1 of the
💡 Don’t forget to read the documentation of the predict() function from the custom class (src/fasttext_wrapper.py) to understand the expected input format!
Click to see the script content
- Run your
predict_mlflow.pyscript.
- Ensure that the following two descriptions give the same main prediction:
"COIFFEUR"et"coiffeur, & 98789". - Change the value of the
kparameter and try to understand how the output structure has changed accordingly.
Summary
MLflowis versatile- Use of custom frameworks (with a “interface” class)
- Industrialization of training (file
MLproject) - Simple querying of trained and stored models
- Limitation: the trained model is not accessible
- Simplified querying… but irrelevant format for all users
- The model is not deployed
3️⃣ Serving a ML model to users
Essential questions
- Once a ML model has been developed, it must be deployed to serve its end users
- Which production infrastructure ?
- Who are the end users ?
- Batch serving vs. online serving
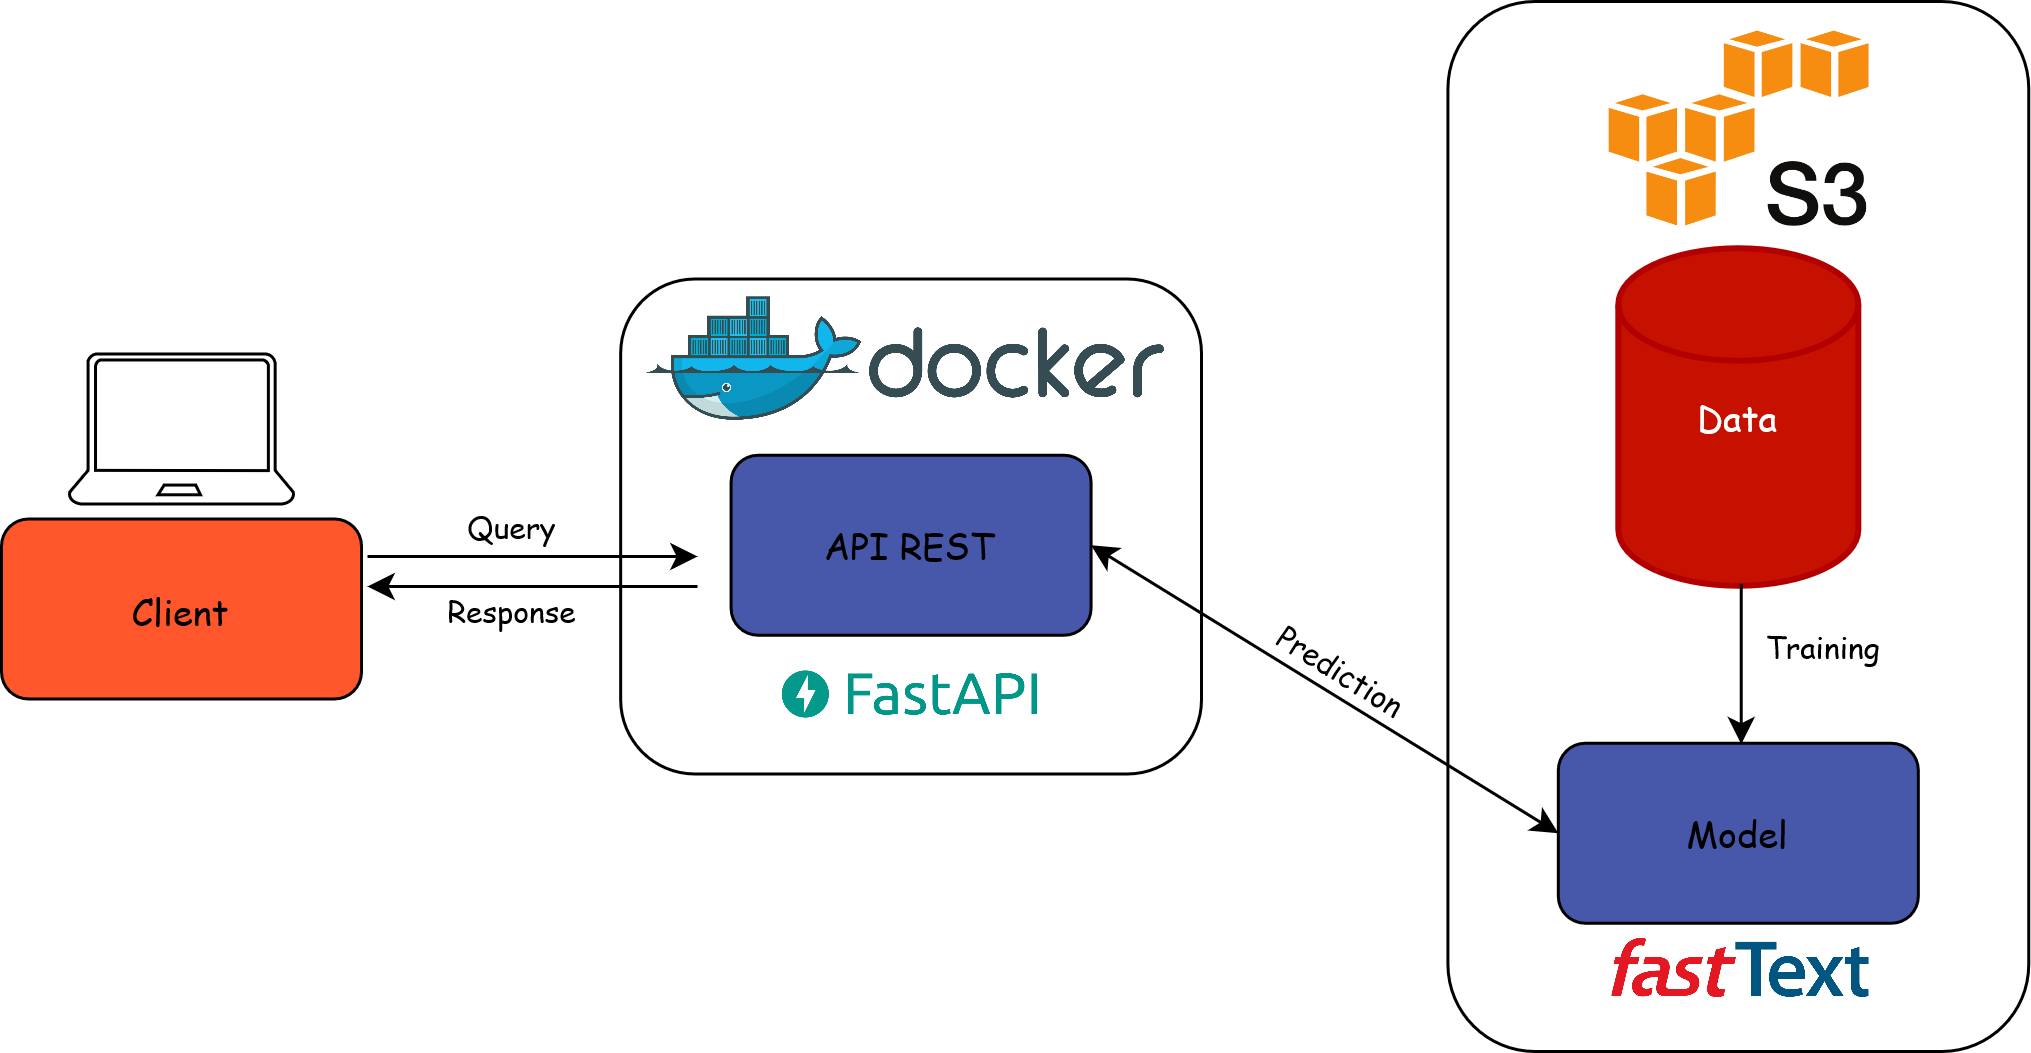
Envisioned configuration
- The model might serve various applications
- Make the model accessible via an API
- Online serving
- Client applications send a request to the API and get a fast response
- Production infrastructure : Kubernetes cluster
Exposing a model through an API
Why expose a model via a REST API?
Simplicity: single entry point that hides the underlying complexity of the model
Standardization: HTTP requests -> agnostic to the programming language used
Scalability: adapts to the load of concurrent requests
Modularity: separation of model management and its availability
Exposing a model through an API
Run the API in a container
Container: self-contained and isolated environment that encapsulates the model, its dependencies and the API code
Advantages:
- Portability
- Scalability to efficiently distribute the model
Technical prerequisites for deploying on
Kubernetes
Deploying an API on Kubernetes

Application 3
Part 1: Exposing a ML model locally as an API
- We constructed a very simplistic Rest API using FastAPI. All underlying files are in the
appfolder. Check them. - Deploy the API locally by running the following commands in a terminal:
- Open the API page using the button provided by
VSCode. - Display your API documentation by adding
/docsto your URL. - Test your API!
Application 3
Part 2 : Deploying manually a machine-learning model as an API
- Open the
Dockerfileto see how the image is built. The image is automatically rebuilt and published via Github Actions, if interested have a look to.github/workflows/build_image.yml. Dans le cadre de cette formation, nous allons tous utiliser cette même image. - Open the file
kubernetes/deployment.ymland modify the highlighted lines accordingly:
deployment.yml
- Open the file
kubernetes/ingress.ymland modify (two times) the URL of the API endpoint to be of the form<your_firstname>-<your_lastname>-api.lab.sspcloud.fr - Apply the three
Kubernetescontracts contained in thekubernetes/folder in a terminal to deploy the API
- Reach your API using the URL defined in your
ingress.ymlfile - Re-train a new model and deploy this new model in your API
Cliquez pour voir les étapes
- Train a model
- Register the model in MLflow
- Adjust your
MLFLOW_MODEL_NAMEorMLFLOW_MODEL_VERSION(if you didn’t modify the model name) environment variable in thedeployment.ymlfile - Apply the new
Kubernetescontracts to update the API
- Refresh your API, and verify on the home page that it is now based on the new version of the model
Application 3
Part 3 : déploiement continu d’un modèle de ML en tant qu’API
⚠️ The previous applications must have been created with the Git option to be able to follow this one.
Previously, you deployed your model manually. Thanks to ArgoCD, it is possible to deploy a model continuously. This means that every modification of a file in the kubernetes/ folder will automatically trigger redeployment, synchronized with your GitHub repository. To convince yourself, follow the steps below:
- Delete the manual deployment of the previous application to prevent Kubernetes resources from overlapping:
- Launch an
ArgoCDservice by clicking on this URL. Open the service, enter the username (admin), and the service’s password. - Commit the changes made and push them to your GitHub repository.
- Open the template
argocd/template-argocd.ymland modify the highlighted lines:
template-argocd.yml
- In ArgoCD, click on
New Appand thenEdit as a YAML. Copy and paste the content ofargocd/template-argocd.yml, and click onCreate. - Reach your API using the URL defined in your
ingress.ymlfile - Display the documentation of your API by adding
/docsto your URL - Try your API out!
- Re-train a new model and deploy automatically this new model in your API
Click to see the steps
- Train a model
- Register the model in MLflow
- Adjust your
MLFLOW_MODEL_NAMEorMLFLOW_MODEL_VERSION(if you didn’t modify the model name) environment variable in thedeployment.ymlfile - Commit these changes and push them to your GitHub repository.
- Wait for 5 minutes for
ArgoCDto automatically synchronize the changes from your GitHub repository, or force synchronization. Refresh your API and check on the homepage that it is now based on the new version of the model.
Application 3
Part 4: Querying your deployed model
- Create a file
predict_api.py. This script should:- Read the parquet file available at the following address:
- Make queries to your API for each label present in the parquet file.
- Display the prediction results.
Click to see the script content
predict_api.py
import pandas as pd
import requests


# Function to make a request to the API
def make_prediction(api_url: str, description: str):
    params = {"description": description, "nb_echoes_max": 2}
    response = requests.get(api_url, params=params)
    return response.json()


# Data URL
data_path = "https://minio.lab.sspcloud.fr/projet-formation/diffusion/mlops/data/data_to_classify.parquet"

# Load the Parquet file into a pandas DataFrame
df = pd.read_parquet(data_path)

# API URL
api_url = "https://<your_firstname>-<your_lastname>-api.lab.sspcloud.fr/predict"

# Make the requests
responses = df["text"].apply(lambda x: make_prediction(api_url, x))

# Display the DataFrame with prediction results
print(pd.merge(df, pd.json_normalize(responses),
               left_index=True,
right_index=True))- Run your
predict_api.pyscript.
In ArgoCD, open your application and click on your pod that should start with
"codification-api-...". Observe the logs.What information do you have? Is it sufficient?
Important
We performed a series of GET requests here as we have a single entry point to our API. To perform batch queries, it is preferable to use POST requests.
Summary
4️⃣ Machine learning in production
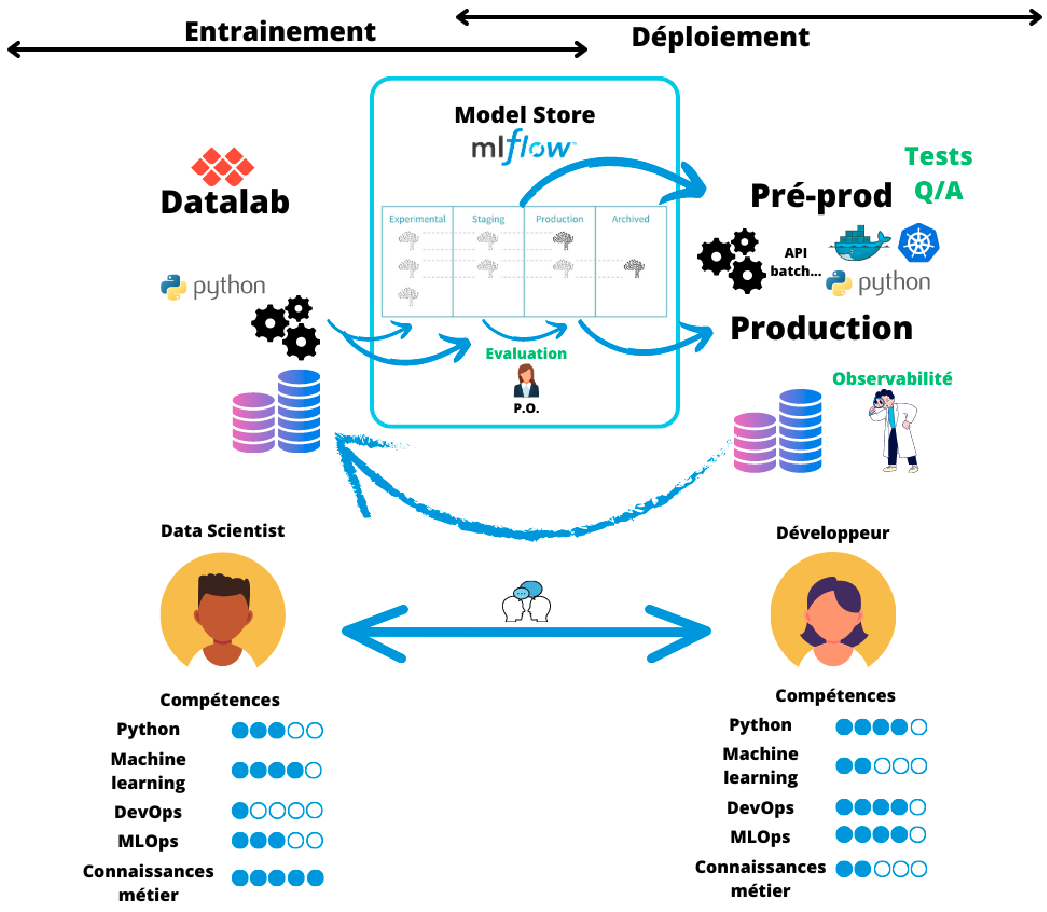
Lifecycle of a ML model in production
The challenge of responsibility
- The lifecycle of a ML model is complex
- Several stakeholders involved:
- Data scientists
- IT/DevOps
- Business teams
- Different expertise and vocabulary between these stakeholders
➡️ Communication essential between teams to monitor the model in production
Why monitor a model in production?
- Detect biased data: unalignment between production and training data
- Anticipate model instability: stable model performance over time
- Continuously improve the model: regular retraining
⚠️ The term monitoring of an application/model has different definitions depending on the team.
Monitoring according to the IT specialist
- Monitoring an application is part of the DevOps approach
- Technical control of the model:
- Latency
- Memory
- Disk usage
- …
Monitoring according to the data scientist
- Monitoring a ML model is part of the MLOps approach
- Methodological control of the model
- Real-time performance monitoring of the model often impossible, use of proxies:
- Data drift: the input data distribution changes over time
- Concept drift: the modeled relationship changes over time
How to monitor a model in production?
- Integration of logs in the API
- Collection and formatting of logs
- Monitoring of ML metrics
- Implementation of an alert system
Application 4
Part 1: Logging business metrics
- Using the logging package, add logs to your API. For each request, display the label to be coded as well as the responses returned by your API. To do this, modify the
app/main.pyfile.
Click to see the steps to complete
- Import the logging package:
- Set up your logging configuration before defining your first entry point:
main.py
- Add the label and the API response to your logs:
Commit your changes and push them to your remote repository.
Whenever you make a change to your API, it needs to be redeployed for the changes to take effect. In theory, it would be necessary to rebuild a new image for our API containing the latest adjustments. To simplify, we have already built the two images with and without logs in the API. Until now you have used the image without logs, redeploy your API using the image with logs tagged as
logs.
Click to see the steps to complete
- In the
kubernetes/deployment.ymlfile, replace theno-logstag with thelogstag:
deployment.yml
Commit your changes and push them to your remote repository.
Wait 5 minutes for
ArgoCDto automatically synchronize the changes from your Github repository or force synchronization.
- Run your
predict-api.pyscript.
- In ArgoCD, open your application and click on your pod that should start with
"codification-api-...". Observe the logs.
Model observability through a dashboard
- API logs now contain business information
- For processing/storage of logs: ETL pipeline
- To analyze the behavior of the coding engine: creation of a dashboard
- Multiple solutions for the dashboard: Grafana, Quarto Dashboards, Apache Superset, …
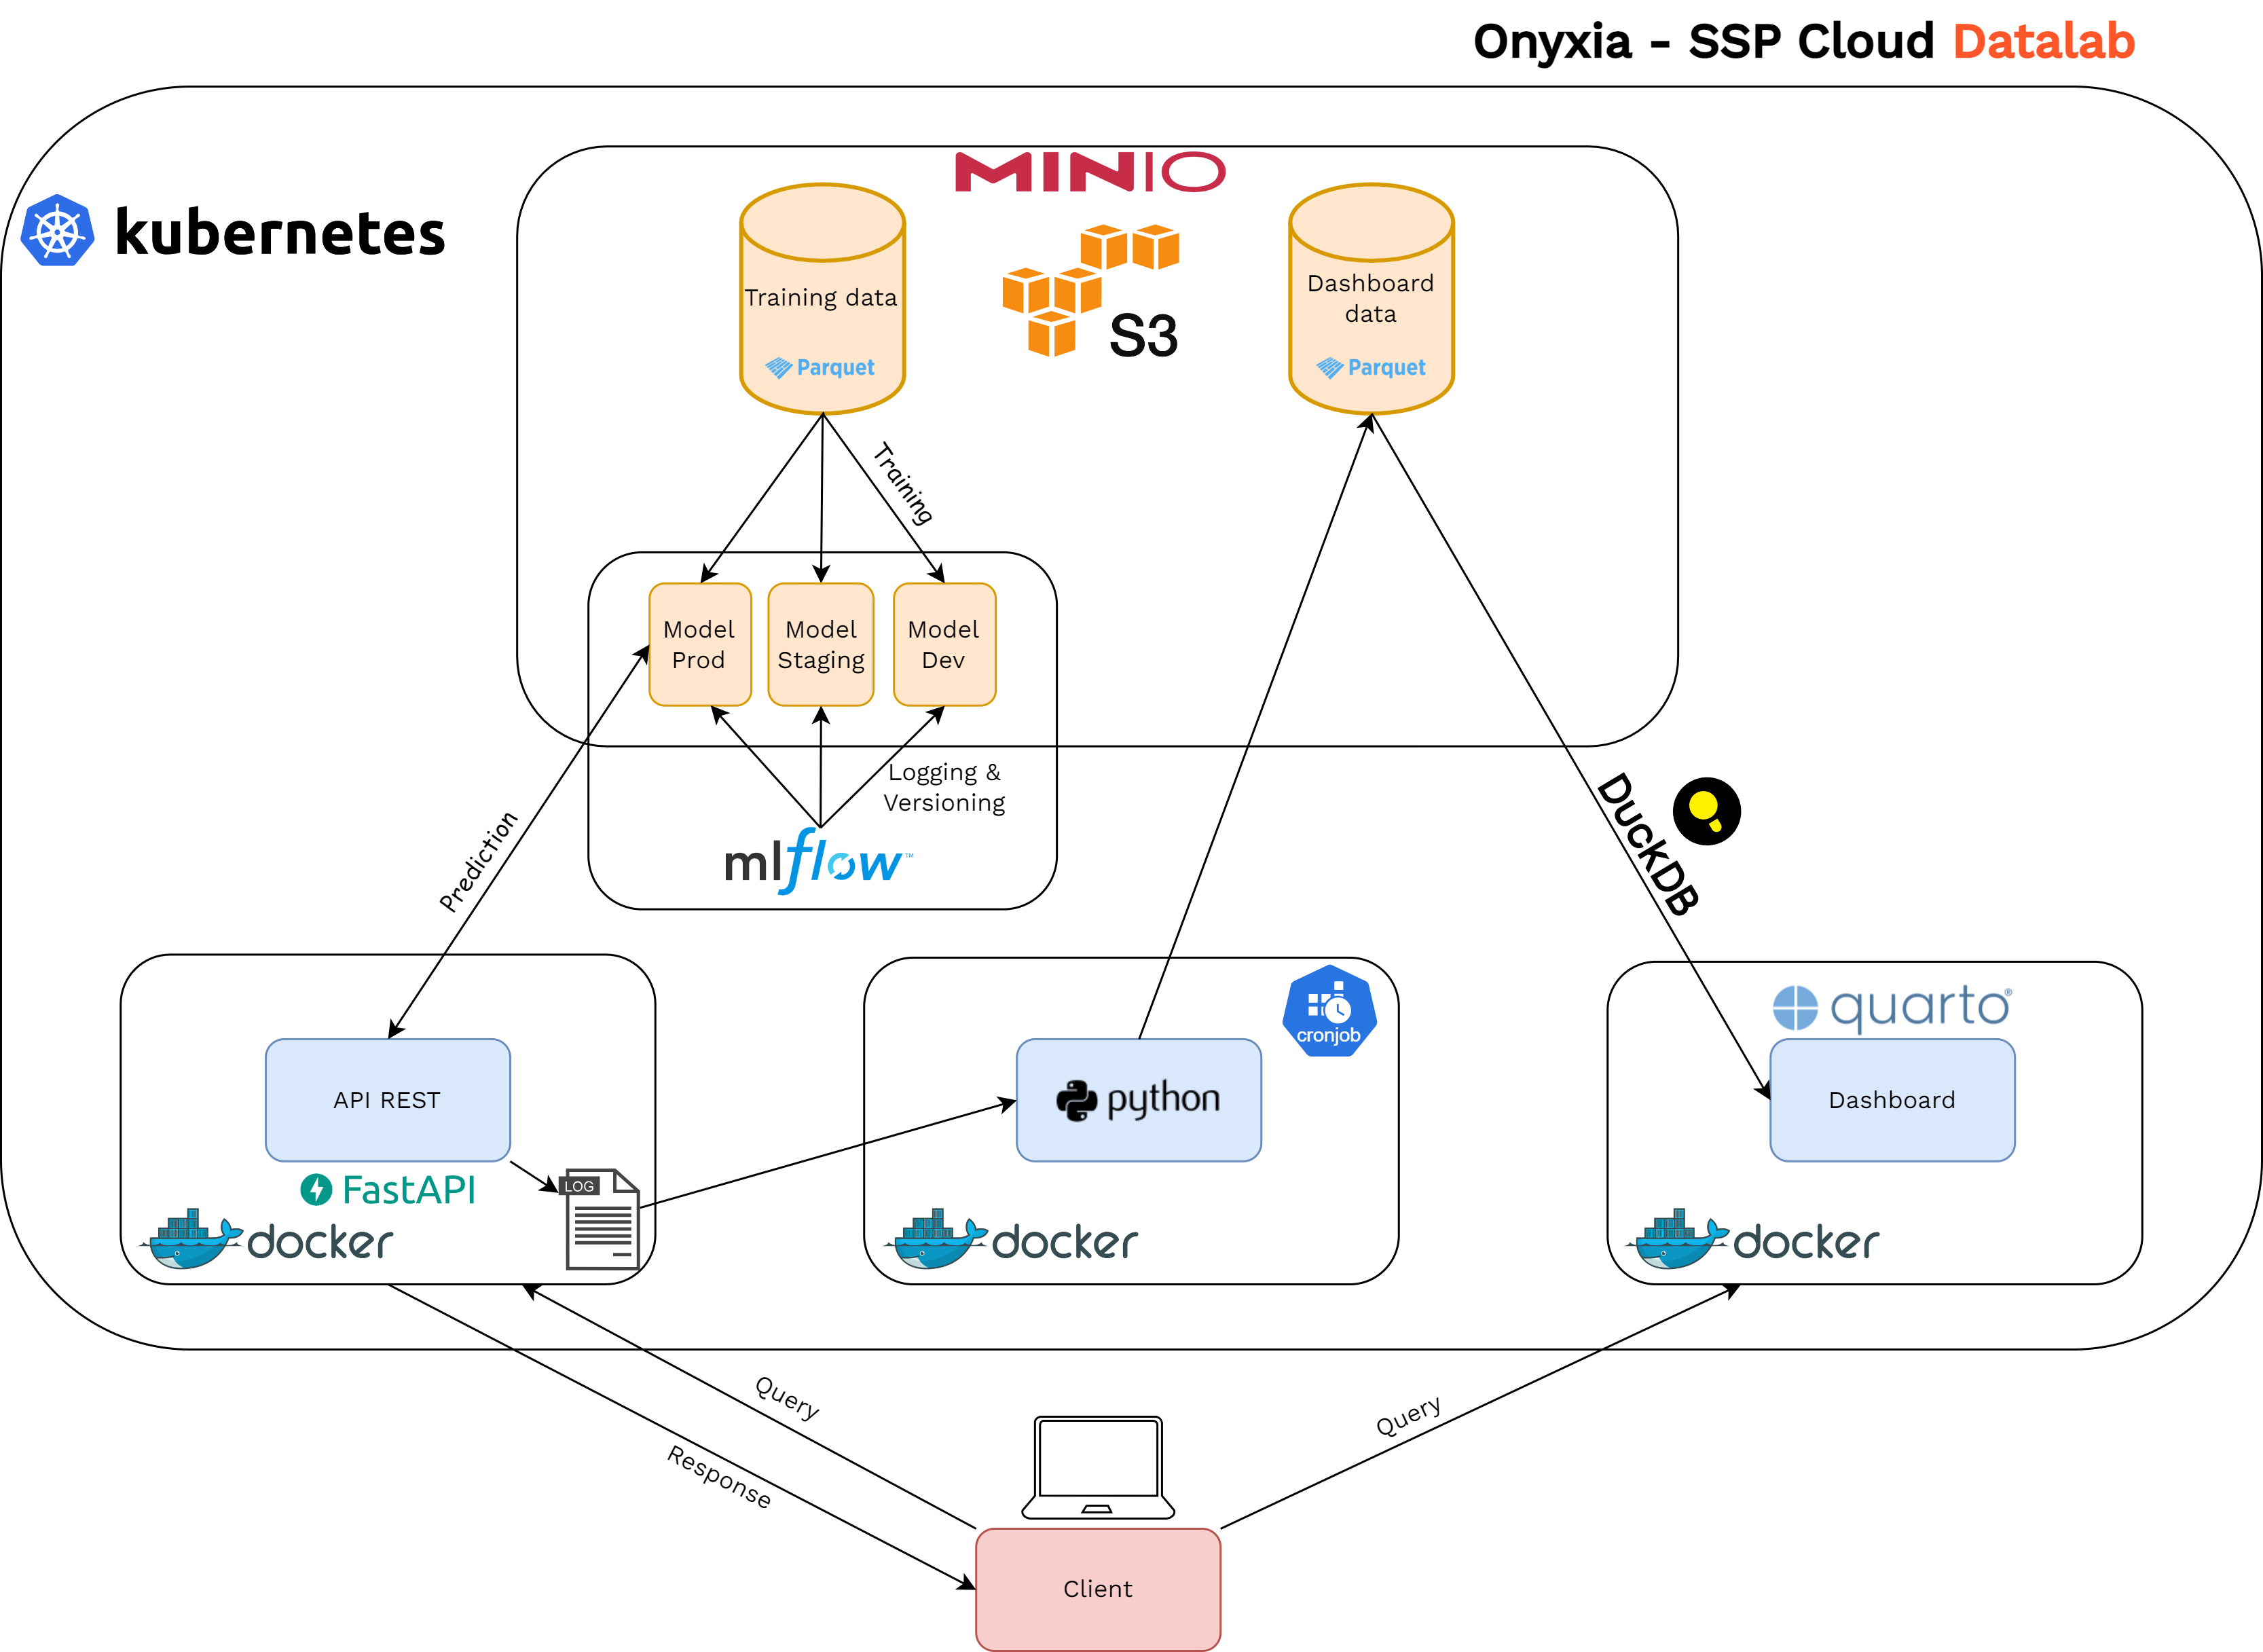
An example stack
- ETL in the form of a cron job that parses logs and stores them in
.parquetformat - Using DuckDB to query the
.parquetfiles - … and create the components of a Quarto Dashboard
- The dashboard is a static site to be updated daily, for example
An example stack
Application 4
Part 2: Creating a monitoring dashboard
We will use
Quarto Dashboards. Open thedashboard/index.qmdfile and inspect the code. To retrieve the data needed to create the dashboard, we use a serverless DBMS:DuckDB.DuckDBallows us to runSQLqueries on a.parquetfile containing parsed logs. This file contains one row per prediction, with the variablestimestamp,text,prediction_1,proba_1,prediction_2, andproba_2.To visualize the dashboard, enter the following commands in a
Terminalfrom the project root and click on the generated link.Currently, the percentage of predictions with a probability greater than 0.8 does not correspond to reality. Modify the SQL query to obtain the
pct_predictionsvariable to display the correct value.
Click to see the answer
- The two charts at the bottom of the dashboard are also incorrect. Modify the SQL query to obtain the
daily_statsvariable to display the correct charts.
Click to see the answer
- Notice the changes made to the dashboard.
Summary
5️⃣ Distributing the hyperparameter optimization
Parallel training
- With our setup, we can train models one by one and log all relevant information to the MLflow tracking server
- What if we would like to train multiple models at once, for example to optimize hyperparameters ?
Workflow automation
- General principles :
- Define workflows where each step in the workflow is a container (reproducibility)
- Model multi-step workflows as a sequence of tasks or as a directed acyclic graph
- This allows to easily run in parallel compute intensive jobs for machine learning or data processing
Argo workflows
- A popular workflow engine for orchestrating parallel jobs on
Kubernetes- open-source
- container-native
- available on the SSP Cloud
![]()
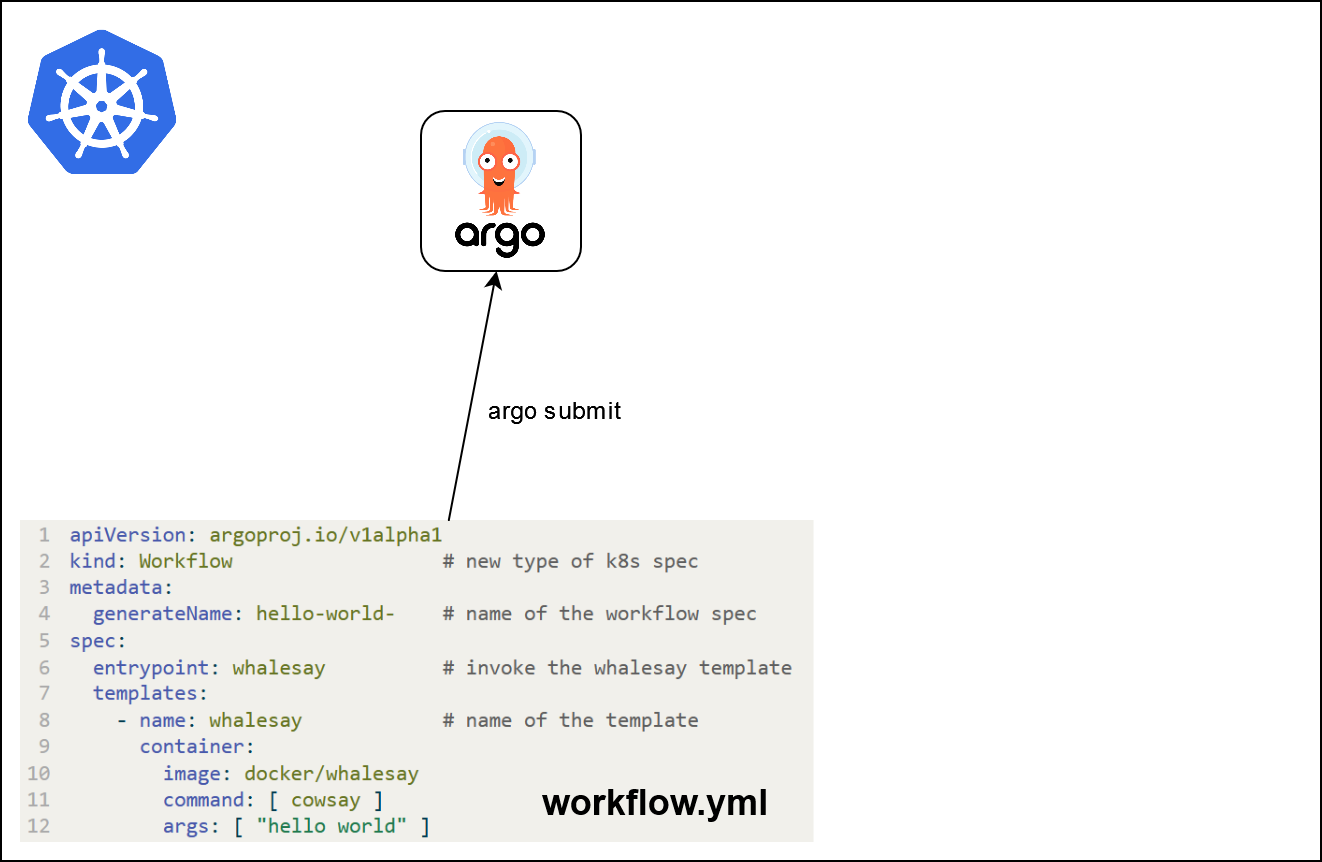
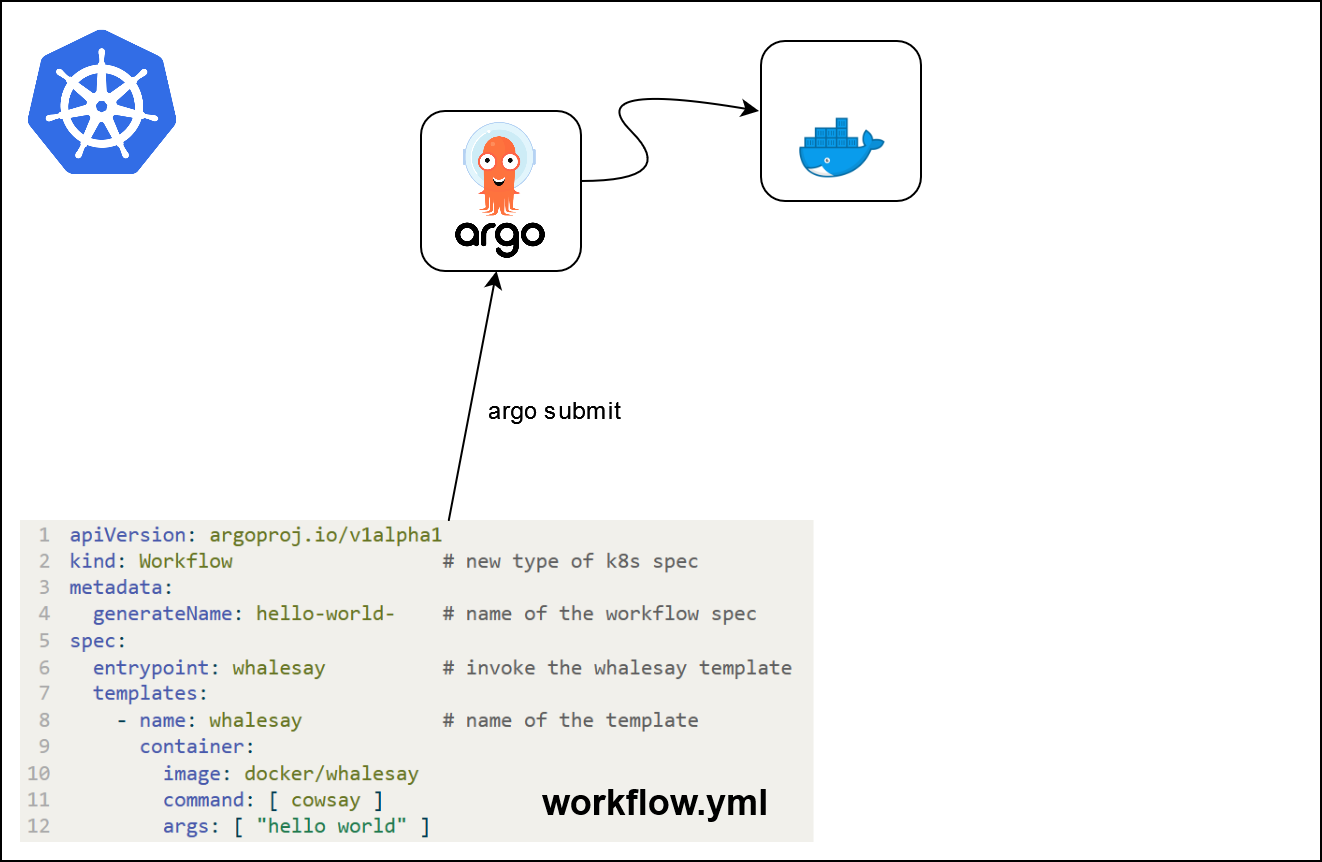
Hello World
apiVersion: argoproj.io/v1alpha1
kind: Workflow                  # new type of k8s spec
metadata:
  generateName: hello-world-    # name of the workflow spec
spec:
  entrypoint: whalesay          # invoke the whalesay template
  templates:
    - name: whalesay            # name of the template
      container:
        image: docker/whalesay
        command: [ cowsay ]
        args: [ "hello world" ]
What is going on ?
What is going on ?
What is going on ?
Parameters
- Templates can take input parameters
apiVersion: argoproj.io/v1alpha1
kind: Workflow
metadata:
generateName: hello-world-parameters-
spec:
entrypoint: whalesay
arguments:
parameters:
- name: message
value: hello world
templates:
- name: whalesay
inputs:
parameters:
- name: message # parameter declaration
container:
image: docker/whalesay
command: [cowsay]
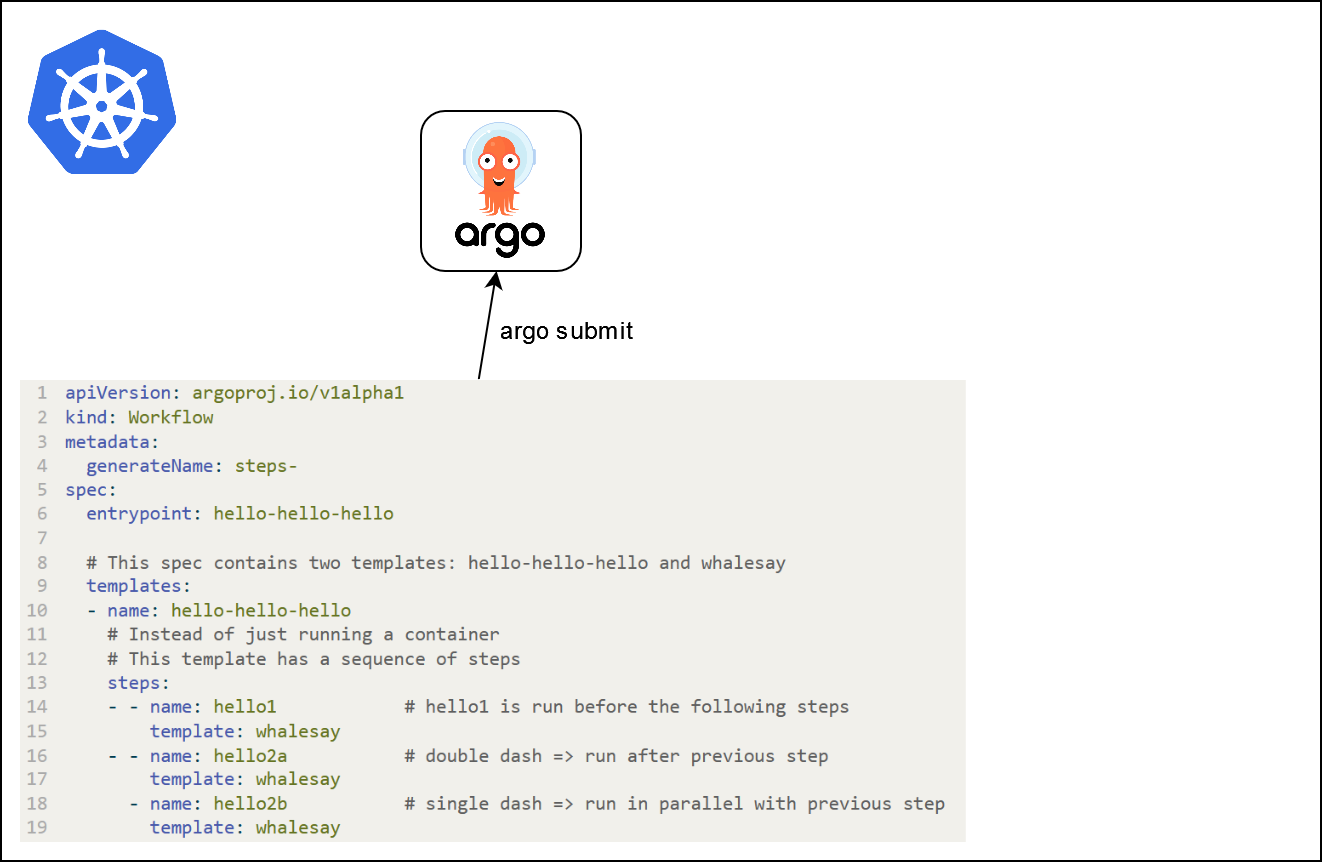
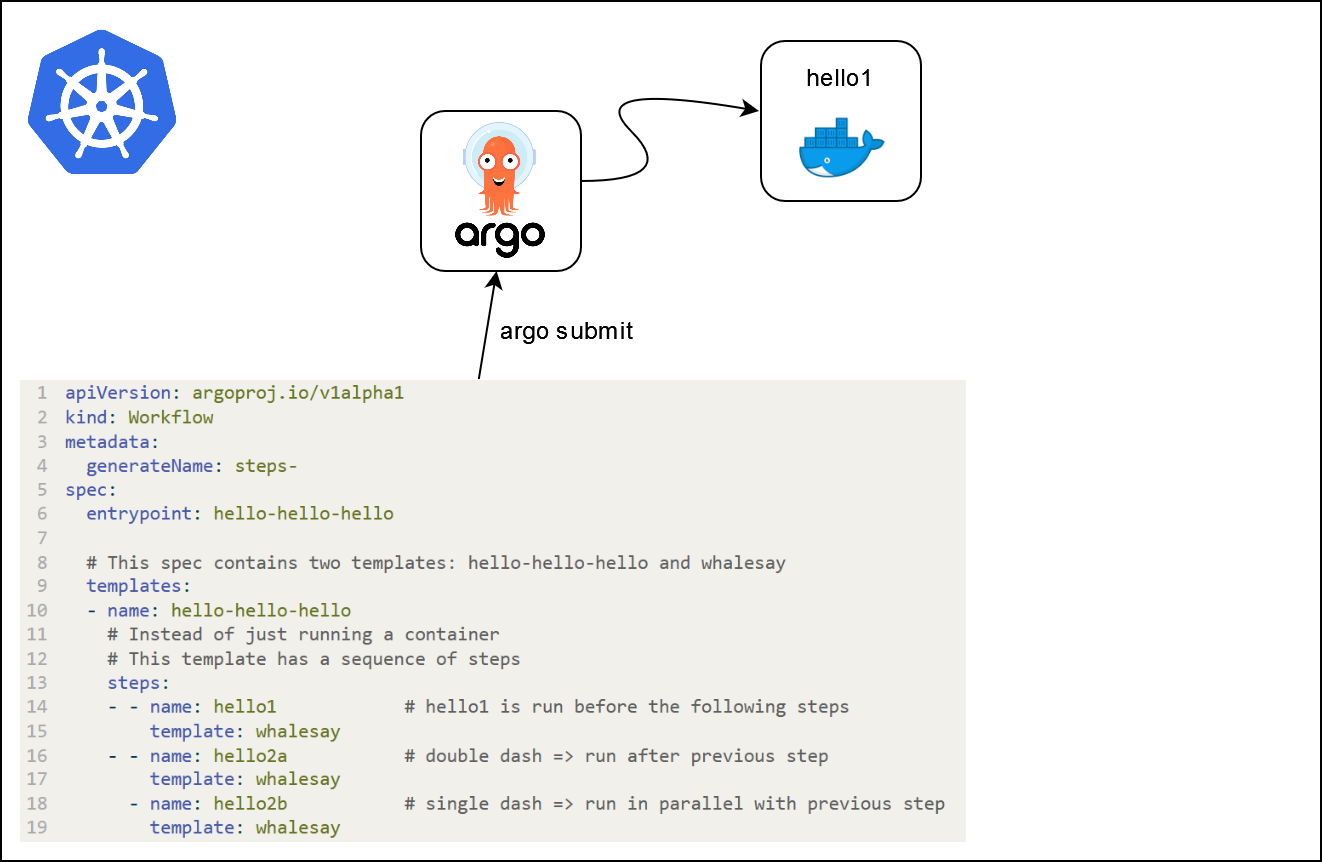
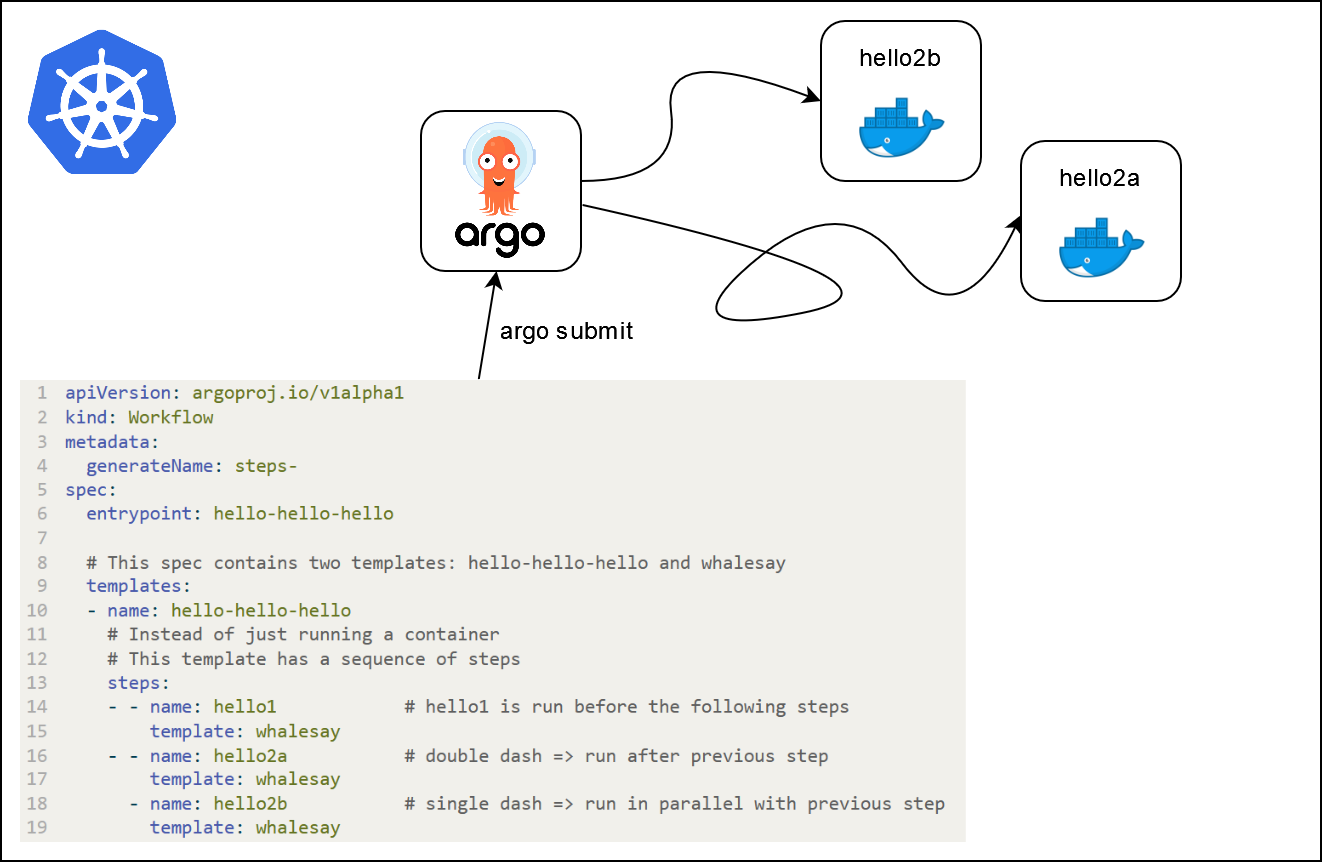
args: ["{{inputs.parameters.message}}"]Multi-step workflows
- Multi-steps workflows can be specified (
stepsordag)
apiVersion: argoproj.io/v1alpha1
kind: Workflow
metadata:
  generateName: steps-
spec:
  entrypoint: hello-hello-hello

  # This spec contains two templates: hello-hello-hello and whalesay
  templates:
  - name: hello-hello-hello
    # Instead of just running a container
    # This template has a sequence of steps
    steps:
    - - name: hello1            # hello1 is run before the following steps
        template: whalesay
    - - name: hello2a           # double dash => run after previous step
        template: whalesay
      - name: hello2b           # single dash => run in parallel with previous step
        template: whalesay
  - name: whalesay              # name of the template
    container:
      image: docker/whalesay
      command: [ cowsay ]
      args: [ "hello world" ]
What is going on ?
What is going on ?
What is going on ?
What is going on ?
What is going on ?
Further applications
- Workflow to test registered models, or models pushed to staging / production
- Workflows can be triggered automatically (via Argo Events for example)
- Continuous training workflows
- Distributed machine learning pipelines in general (data downloading, processing, etc.)
Further applications
Notes
- Python SDK for Argo Workflows
- Kubeflow pipelines
- Couler : unified interface for constructing and managing workflows on different workflow engines
- Other Python-native orchestration tools : Apache Airflow, Metaflow, Prefect
Application 5
Part 1 : introduction to Argo Workflows
- Launch an
Argo Workflowsservice by clicking this URL. Open the service and input the service password (either automatically copied or available in theREADMEof the service) - In
VSCode, create a filehello_world.yamlat the root of the project with the following content:
hello_world.yml
apiVersion: argoproj.io/v1alpha1
kind: Workflow
metadata:
  generateName: hello-world-
  labels:
    workflows.argoproj.io/archive-strategy: "false"
  annotations:
    workflows.argoproj.io/description: |
      This is a simple hello world example.
      You can also run it in Python: https://couler-proj.github.io/couler/examples/#hello-world
spec:
  entrypoint: whalesay
  templates:
  - name: whalesay
    container:
      image: docker/whalesay:latest
      command: [cowsay]
args: ["hello world"]- Submit the
Hello worldworkflow via a terminal inVSCode:
- Open the UI of
Argo Workflows. Find the logs of the workflow you just launched. You should see the Docker logo .
Application 4
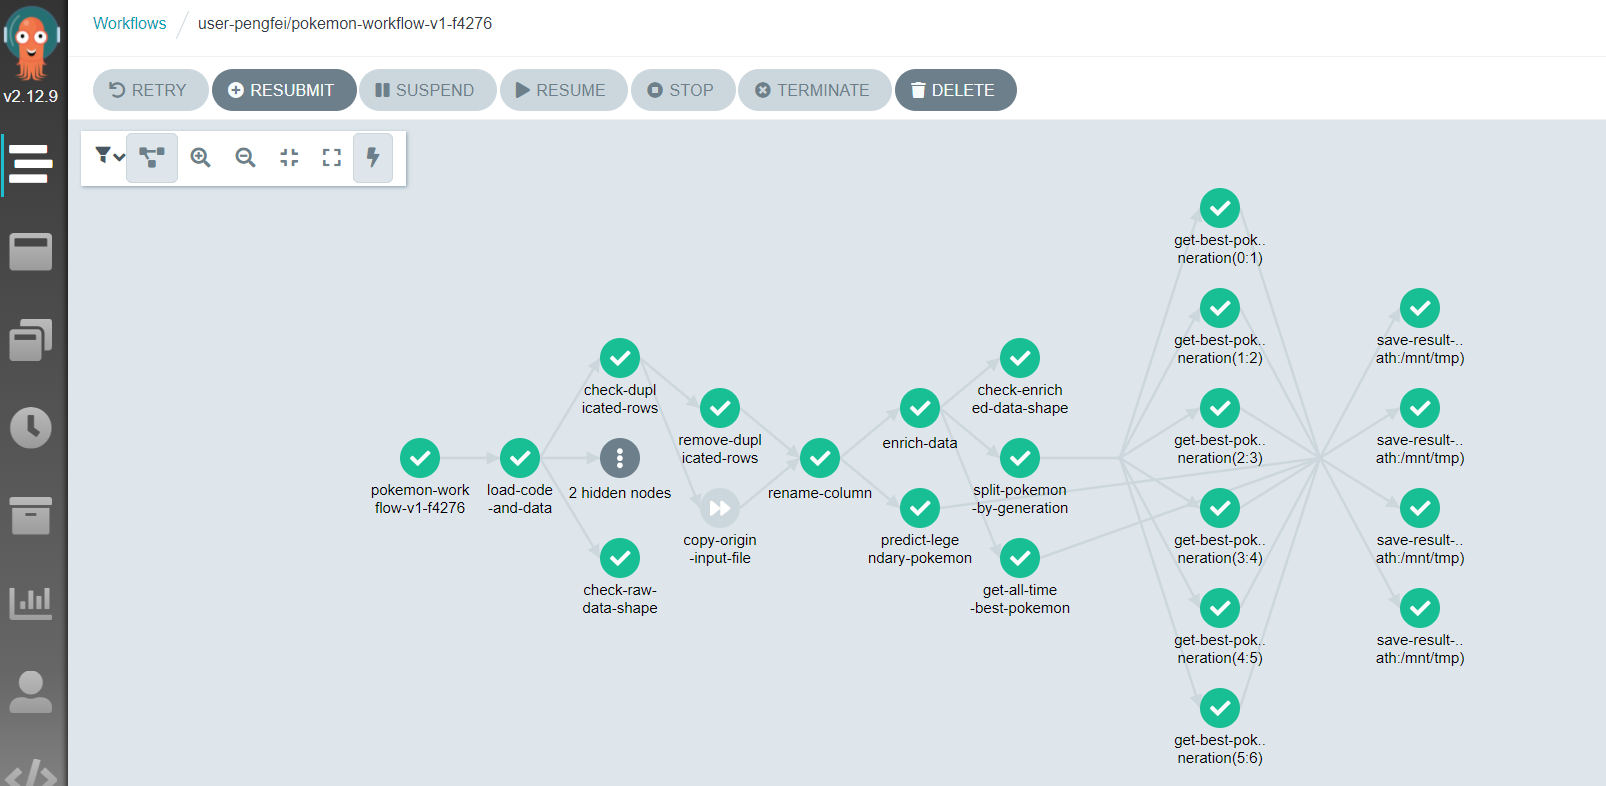
Part 2 : distributing the hyperparameters optimization
- Take a look at the
argo_workflows/workflow.ymlfile. What do you expect will happen when we submit this workflow ? - Modify the highlighted line in the same manner as in application 3.
workflow.yml
- Submit the workflow and look at the jobs completing live in the UI.
- Once all jobs are completed, visualize the logs of the whole workflow.
- Finally, open the
MLflowUI to check what has been done.
Conclusion
The opportunity for more continuous organizations
Required transformations
- Transformations at different levels
- Technical tools
- Methodological
- Organizational
- Strategy: incremental change
- Training
- Application to pilot projects
An introduction to MLOps with MLflow